How to setup a LAMP Server on CentOS 7 - Apache, MySQL, PHP?
In this tutorial I assume you already have either a VPS or a Dedicated Server with CentOS 7 installed. If you do not have one you can get it at reasonable prices at Marmasco Technologies. You must also have SSH access to your server and at least one text editor. I will be using a VPS with CentOS 7, SSH access and Nano text editor.
We will start by installing EPEL Repository. Have I become too difficult already? Don’t worry! EPEL (Extra Packages for Enterprise Linux) is open source and free community based repository project from Fedora team which provides 100% high quality add-on software packages for Linux distribution including RHEL (Red Hat Enterprise Linux), CentOS, and Scientific Linux. So we will be using EPEL Repository with Yum command to install all the required packages and software in this tutorial. Below is the command that will install EPEL for you:
rpm --import /etc/pki/rpm-gpg/RPM-GPG-KEY*
yum -y install epel-release
I used this declaration -y only because I am sure all the confirmations in this this install need yes. Do not always use it if you are not sure of everything the install will bring into your machine. It is always a good practice to check for updates before installing a software or package in any Unix System. To update all packages automatically simply run the following command:
yum update
We will start with Apache Web Server. Since we now have our EPEL Repository installed and enabled the following simple command will do the work:
yum -y install httpd
The above will install Apache Web Server, but will not start it automatically. Use the following command to start Apache:
systemctl start httpd.service
Congratulations! You now have apache working in your server. Since you may be using a firewall you must allow Apache to use http and https services permanently. If you get an error that says command not know it means you do not have firewalld service installed. It is good to have it though. Run the following commands one after another in your command line:
firewall-cmd --permanent --zone=public --add-service=http
The above will allow Apache to be accessed over insecure http. To also add https run the following command:
firewall-cmd --permanent --zone=public --add-service=https
Now you have to reload the firewall rules to reflect your new changes. Simply reload firewalld with the following command:
systemctl restart firewalld
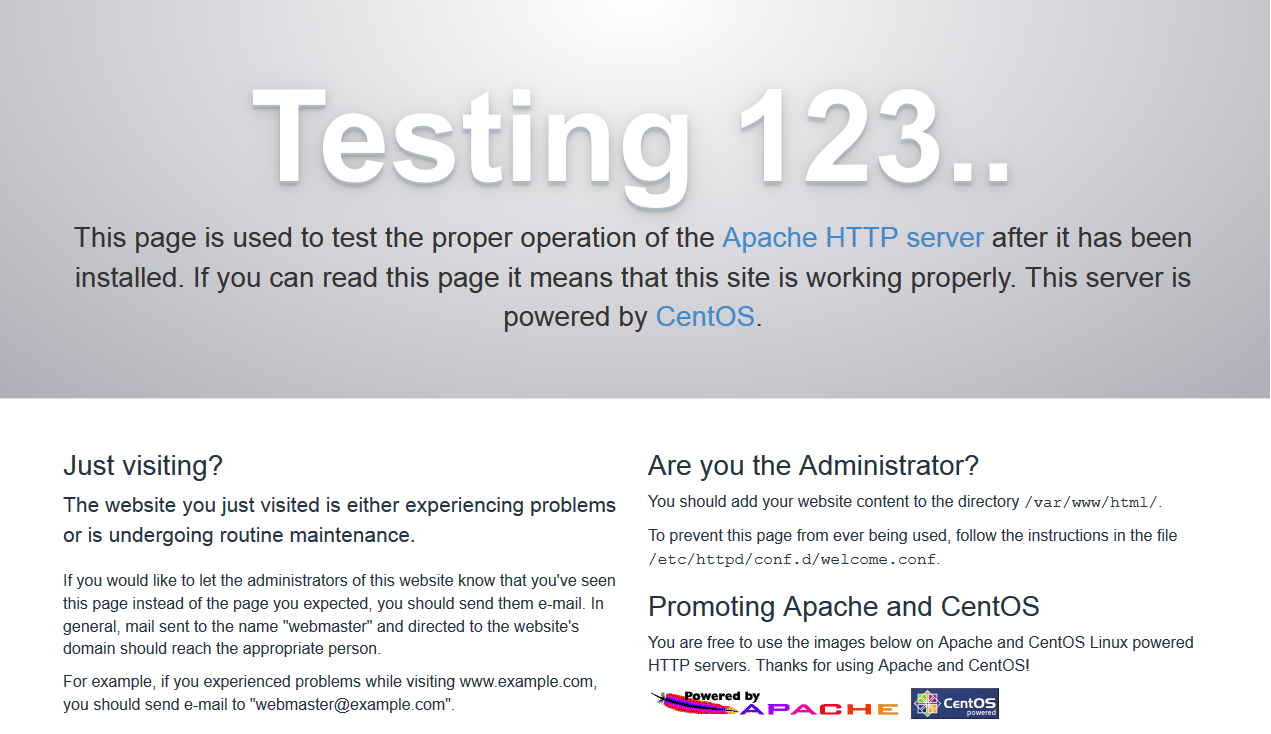
Your Web Server is now ready with Apache. You can test if your server is online by browsing to http://ip-address on any device connected to the internet. If you are installing on a local machine simply go to http://localhost to see your Apache default page. However, your system does not know when to start apache when you reboot your server. So we need to create a symbolic link that will start Apache Web Server every time the system reboots. To do so just run the following command:
systemctl enable httpd.service
That is all for Apache. If your website is mere html you can be good to go and upload your files now. If your website needs PHP and MySQL let’s continue with our tutorial. We will now install MySQL Server. To install simply run the following command:
yum -y install mariadb-server mariadb
After installing MySQL Server, you must start is and enable it for auto start after system reboot. The following command start MySQL:
systemctl start mariadb.service
The following then creates a symbolic link to always start MySQL after reboot:
systemctl enable mariadb.service
Your MySQL Server is ready! Before you start using it we need to put a password and add some security enhancement. Except for the New Password, enter Y on all the prompts you will get from the wizard. Run the following command to start:
mysql_secure_installation
So we have installed and configured Apache and MySQL. I know you can’t wait to see how you can now install PHP into your system. In this tutorial we will install PHP 7.3, but I will show you how to install other versions though. CentOS ships with an old version of PHP so we will find the latest versions from the Remi Repository. Run the following commands to install Remi Repository:
rpm -Uvh http://rpms.remirepo.net/enterprise/remi-release-7.rpm
Now we need the yum utilis so we run the following command:
yum -y install yum-utils
Now we are ready to install any version of PHP. I will start by the latest and recommended version. Just to be certain on everything I prefer to check for any updates before we begin. Run the following command:
yum update
Now install PHP 7.3 with the following command:
yum-config-manager --enable remi-php73
yum -y install php php-opcache
For other versions choose any of the following commands:
Select only the line with the version you want, unless you need to install all;
yum -y install php
yum-config-manager --enable remi-php70
yum-config-manager --enable remi-php71
yum-config-manager --enable remi-php72
yum-config-manager --enable remi-php73
yum -y install php php-opcache
It is necessary to note that PHP does not support MySQL out of the box. It is not complicated to get MySQL support in PHP. Simply run the following command to install the required module:
yum -y install php-mysqlnd php-pdo
We have successfully installed PHP in our system. Let us restart Apache Server to reflect new changes. Run the following commands to do that:
systemctl restart httpd.service
Congratulations! Your LAMP is now installed. You have your CentOS 7 with Apache Web Server, MySQL Server and PHP running. Now you can run your PHP database driven website like WordPress.
MORE ARTICLES

How to install WordPress on CentOS 7 through Terminal?
Here is a simple guide on how to install WordPress on CentOS 7 without a...
READ FULL ARTICLE
How to fix Error Establishing a Database Connection on WordPress?
This tutorial will help you if your WordPress website suddenly began to show "Error Establishing...
READ FULL ARTICLE